When, Why, and How to Winterize Your RV (Step-by-Step Guide for First-Time RV Owners)
- Eric Beuning
- Oct 22, 2025
- 7 min read

Updated: Oct 28, 2025

Winterizing your RV isn't just a good idea, its a mandatory part of RV ownership. Protecting your plumbing, removing your batteries, and taking care of the tires ensures they'll work properly next spring. They also go a long way toward maximizing the return on your investment.
Of course, different types of RVs require different measures. Popup campers inevitably need less Winterizing than travel trailers, fifth wheels, and motorhomes. Still, some universal basics need to be done right to spare your RV from the cold ravages of winter.
Living in Minnesota, I have to face some of the most brutal winters with heavy snows, high winds, and sub-zero temperatures. So, I thought I'd bring you some of the RV Winterizing best practices my friends and I use for our rigs.
Why It’s Important to Winterize Your RV
Without proper winterizing, freezing temperatures can easily damage your RV’s plumbing, fixtures, seals, and appliances. It can also damage batteries, cause maintenance issues with your HVAC system, and even leave your RV vulnerable to rodent infestations!
When temperatures drop below freezing, any water in your pipes and holding tanks can expand and crack fittings, pumps, and valves, leading to expensive repairs. This simple, preventative process protects your RV and saves you frustration when it’s time to travel again.
By taking the time to properly winterize your RV you do more than just ensure it’ll be travel-ready next spring. A properly maintained RV retains its value and shows the kind of pride of ownership that potential buyers, insurers, and lending agencies look for.
When Should You Winterize an RV?
You need to winterize your RV or at least protect the plumbing system before overnight temperatures drop below freezing. Waiting too long to winterize your RV can lead to expensive damage. Even RVs built with “four-season packages” aren’t immune to freezing lines if they sit unused in temperatures under 32 degrees.
Most RV owners choose to winterize toward the end of their camping season, typically between late September and early November, depending on where they live or travel. When in doubt, it’s better to winterize early rather than gamble with cracked fittings, frozen pipes, or a burst water heater tank.
What If You Want to Use Your RV in the Fall?
Where I live in Minnesota, a lot of people use their RVs deep into the fall for hunting base camps. If this sounds like you, or you want to take a few fall RV trips, you might have to partially winterize your RV.
This means draining the waterlines at night when the temps drop and filling the goosenecks of all your drains with RV antifreeze. If you’re not using it, or keeping it heated, you should pull the batteries as well. Freezing temperatures can damage lithium-ion batteries and deplete lead-acid.
How to Winterize Your RV
Once you’re done using it for the year, you can use the following steps to winterize your RV like a checklist.
Step 1: Drain the Fresh Water System

Draining your RV’s freshwater system is the foundation of winterizing your RV. Start by turning off the water pump, disconnecting city water, and opening all faucets, low-point drains, and the freshwater tank valve.
Draining the system removes the majority of water so you can properly protect the remaining lines in later steps. Make sure to open sinks, the shower, and your outdoor shower if equipped. Once everything has drained, leave faucets open until you are fully done winterizing.
Draining and protecting your holding tanks is essential because leftover moisture can freeze and damage valves or seals. Empty your gray and black tanks completely, flush if possible, then close the valves.
Add a small amount of RV antifreeze to sinks, showers, and P-traps to prevent any remaining water from freezing. This also keeps seals lubricated while your RV sits in storage.
Step 2: Bypass and Drain the RV’s Water Heater

Bypassing and draining the water heater prevents antifreeze from filling the tank and saves you several gallons of product. Protecting your hot water tank is an essential step because it can be costly to replace. First, turn off your water heater and allow it to fully cool.
Then remove the drain plug or anode rod to empty the tank. Once drained, switch your system to “bypass mode,” using your RV’s built-in bypass valves or an aftermarket bypass kit.
Step 3: Protect Your RV’s Pipes from Freezing
Protecting your water pipes from freezing is an easy and essential part of winterizing your RV. You have two accepted methods: the “blow-out” method or the “RV antifreeze” method.
With the blow-out method, you use an air compressor and a blow-out plug to push air through the lines until no water remains. With the antifreeze method, you pump non-toxic RV antifreeze through every faucet and fixture until pink liquid flows from each tap.
Pro Tip: While both work, the antifreeze method offers better protection for sub-zero temperatures. It’s what my friends and I do in Minnesota, as do all the RV dealers selling used models.
Step 4: Prep Interior Systems for Winter
Preparing your RV’s interior systems for winter means making sure your appliances, batteries, and surfaces stay in good condition through freezing temperatures. This starts with cleaning out the refrigerator and leave the doors open to prevent odors.
You also want to remove every last crumb of perishable food, which call for a little bit of deep cleaning. Rodents looking for shelter and a place to breed will be attracted to the smell of those snack crackers in the couch cushions. Even that jar of peanut butter you forgot in the overhead cabinet that seems too high for them will put enough odor in the air to draw them to your RV’s door.
In the process, be sure to wipe down all surfaces. Using an ammonia-based cleaning solution or one scented with peppermint also helps deter rodents from making their way into your RV.
Be sure to vacuum the floors and upholstered surfaces thoroughly. Then open cabinets for maximum airflow. Consider placing moisture-absorbing canisters or a small dehumidifier inside to prevent mold while your RV is in storage.
Step 5: Remove the House Batteries
If storing your RV in freezing temperatures, remove house batteries and store them in a climate-stable space off the floor. Then connect a smart charger to them every month or so in the winter to make sure they don’t lose charge. Lead-acid batteries can be damaged if they’re left too long at 50% charge or less.
Pro Tip: Remove any portable appliances involved with food prep as well. That toaster with its crumbs inside might not seem accessible by rodents, but they’ll still smell it. In extreme cases, I’ve even seen some appliances with the cords chewed over the winter.
Step 6: Seal and Protect the Exterior
Sealing and protecting your RV’s exterior shields it from moisture, ice, and UV damage during the winter months. Inspect and seal roof seams, windows, and doors with an RV-safe sealant.
I also strongly recommend covering your RV for long-term storage. This calls for investing in a quality RV cover and taking the time to install it correctly, which will go a long way toward preserving the exterior. It also helps prevent water leaks on the roof and potential freeze-thaw ice damage in the vents and rooftop air conditioner.
Step 7: Protect Your RV’s Tires
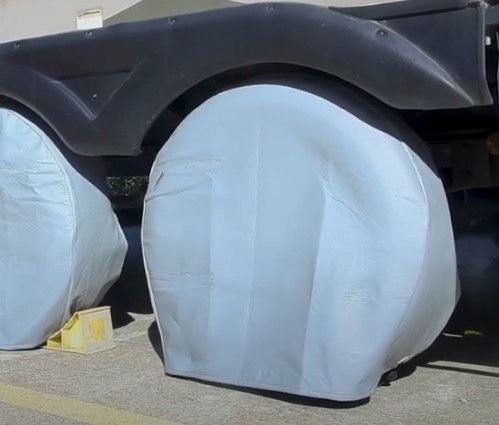
Tires are one of the most overlooked things in RV winterizing, which can be a very expensive mistake. Take the time to check the pressure of each tire and then pump it up 5 PSI over normal. When cold weather strikes, tires tend to lose pressure, and if one goes completely flat, it can be damaged to the point of needing replacement in the spring.
If possible, try to park the RV with the valve stems toward the top of the tire. That way if you do need to refill one in the winter, it’s easy to get at without having to fight the snow.
If your RV cover doesn’t come with tire covers, you should invest in some. Even placing some plywood in front of the cover will help prevent UV damage to the vulnerable sidewalls.
Pro Tip: Invest in a portable air compressor, so that you can easily inflate a low RV tire in the dead of winter. I keep a small one in my truck. Then, if I see an RV tire looking low, I can pull up to it and pump it up using the power port.
How to Winterize a Motorhome’s Engine
If you have a motorhome, you also need to winterize the engine and other essential systems. This starts with changing the engine oil and filter. Used oil contains moisture and contaminants that can cause internal corrosion during long storage periods.
You also need to inspect and test the motorhome's coolant/antifreeze mixture in the radiator. Make sure it’s rated for temperatures well below the coldest weather you expect in your area. Then top it off or replace it if needed.
While you’ve got your head in the RV’s engine bay, take the time to check the hoses, clamps, and drive belts for wear. Cracking accelerates in cold winter weather. A lot of people broke down with a frayed serpentine belt on the side of the road in spring and didn’t check their belt when winterizing their motorhome!
Gasoline Motorhome Engine
Then add fuel stabilizer to your gas tank and top it up. This will prevent varnish buildup and moisture contamination. Just be sure to start the motorhome’s engine and run it long enough to circulate the treated fuel through the system. This also ensures warm oil reaches all components.
Diesel Motorhome Engine
If your coach has a diesel engine, replace the fuel filters and consider using an anti-gel additive. A little attention now helps ensure your motorhome fires up smoothly when the spring travel season returns.
Final Thoughts on Winterizing Your RV
Winterizing your RV properly is a simple preventative project that protects your plumbing, appliances, and structure from freeze damage, rodents, and other winter weather problems. By draining your water system, bypassing your water heater, protecting your pipes, sealing your exterior, and storing your RV correctly, you’ll avoid costly spring repairs and extend the life of your rig. When warmer weather returns, you’ll be ready to hit the road faster, safer, and with total peace of mind.
I strongly recommend investing in an RV cover. When you’re ready to put your rig away for the winter it will protect the exterior from the ravages of winter weather. Not to mention preserve your rooftop air conditioner from potential freeze-thaw damage!
If you want to learn more about RV Travel and other outdoor adventures, you should follow Eric Beuning's Author Page.
Disclaimer: As an affiliate marketer, I earn from qualifying purchases. However, the cost remains the same for you.


Comments